Controlling LEDs correctly: basics, differences & tips
-
8. May 2025
LEDs, control and differences - your overview for practice and projects
LEDs have become an integral part of electronics - whether as a simple status display, decorative RGB lighting or intelligent matrix control. However, there is more technology behind the small dot of light than you might initially think. In this article, I will show you how to use LEDs correctly, which differences there are, which Types of construction are available - and what to look out for in projects with PWM, RGB or WS2812 .
How do you control an LED?
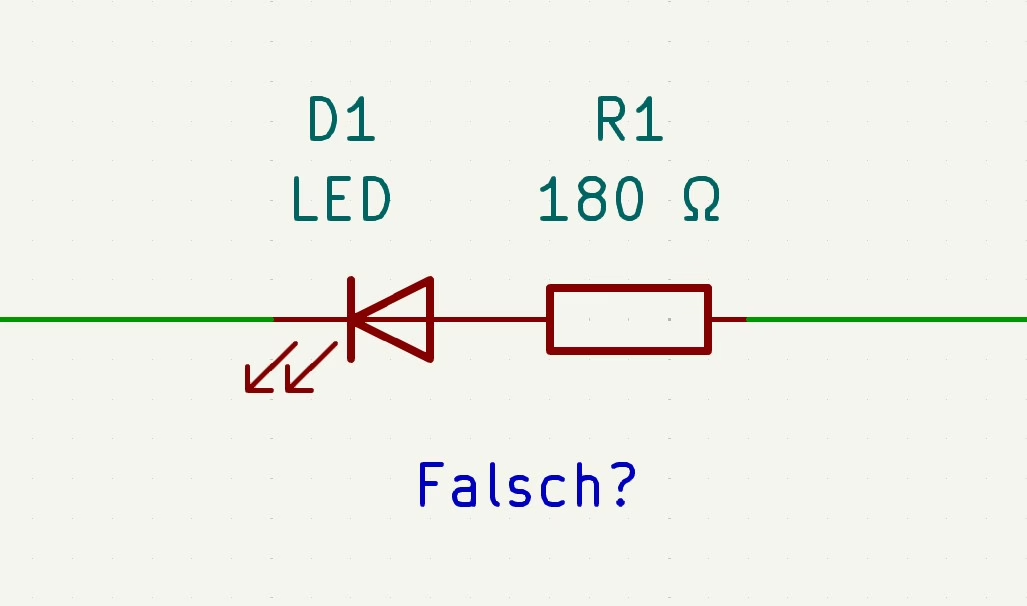
1. with series resistor (classic)
The simplest and most common way. The current is limited with a suitable resistor:
Formula:
R = (USupply – ULED) / ILED
Example:
R = (5 V – 1,9 V) / 0,02 A = 155 Ω
Tip: Use the next highest default value (e.g. 180 Ω) to protect the LED.
Or use my tool to calculate the series resistor:
Go to the tool
Important: The classic series resistor is simple, cheap and often okay for a single status LED - but:
Inefficient (electricity is wasted)
Not temperature compensated
Not dynamically controllable
Unsuitable for load fluctuation or voltage variation
Better alternatives:
PWM via microcontroller with current monitoring (ultra-efficient)
Constant current sources (for several LEDs or high power)
LED driver ICs (for professional applications)
2. via PWM (pulse width modulation)
Instead of limiting the voltage, the light duration per cycle is regulated. The microcontroller switches very quickly between “on” and “off”. This creates a dimmable brightness effect.
Advantages: energy-efficient, easy to dim
3. with an LED driver
Especially with several LEDs or higher currents (e.g. LED strips, lighting). Drivers regulate constant current, independent of voltage fluctuations. Typical: LM317, PT4115, Constant current driver for high-power LEDs.
4. connect to AC? Only with additional technology!
⚠️ Attention: The following information is for educational purposes only. Please do not rebuild - this is dangerous and bad practice:
LEDs are diodes - they conduct in the forward direction and block in the reverse direction. As a result, they automatically take on a Half-wave rectificationThey only light up during every second half-wave (at 50 Hz → 50 times per second).
A capacitor can - depending on frequency, capacitance and load - act as a reactance and thus limit the current. This technology is used, for example, in capacitive power supply units (often in inexpensive night or decorative lighting).
If you switch many LEDs in series (e.g. 60-80 LEDs), you can split the mains voltage so that each LED only receives a small part of the 230 V. In theory, this works - in practice there are many problems:
❌ Why this is not a good idea:
No complete rectification:
Without a bridge rectifier, the LED only lights up every second half-wave → may flicker at 50 Hz. This is less noticeable with many LEDs or in series, but technically unclean.Blocking voltage of the LED:
LEDs usually only tolerate 5-6 V Reverse voltage. 230 V AC (325 V peak) would destroythe LED in the blocking phase, if you drive them without without protective diodes .Capacitive series resistors are tricky:
A capacitor limits current depending on frequency and capacitance, but without current limiting during switch-on pulses, high starting currents can occur → Lifespan suffers.Safety risk:
Anyone operating LEDs directly on mains voltage, without galvanic isolationbuilds a potentially dangerous circuit - the housing (e.g. metal) can carry mains potential.
⚠️ Warning: Connecting LEDs directly to 230 V is dangerous - always use a suitable power supply unit or LED driver!
Conclusion: Bad practice for a reason
LEDs should never be operated directly on 230 V AC - even if it works technically.
Better:
Use a suitable LED power supply unit or driver
Ensure galvanic isolation
Only work with protective circuitry
With a small power supply unit or a constant current LED driver, you are safe, efficient and long-lasting.
Comparison: typical LED voltages and current consumption
| LED color | Forward voltage (V) | Current (max) |
|---|---|---|
| Red | ca. 1,8–2,2 V | 20 mA |
| Yellow | ca. 1,9–2,2 V | 20 mA |
| Green | ca. 2,0–3,2 V | 20 mA |
| Blue | ca. 2,8–3,4 V | 20 mA |
| White | ca. 3,0–3,4 V | 20 mA |
Designs: SMD vs. THT
| Design | Beschreibung | Usage |
|---|---|---|
| THT (Through Hole) | Classic LEDs with long legs | Breadboard, prototyping, simple assembly |
| SMD (Surface Mount) | Compact design for circuit boards | Series production, space-saving projects |
THT is ideal for beginners and quick projects.
SMD is ideal for finished assemblies with solder paste or reflow.
THT LEDs are also used on PCBs in finished assemblies or devices, e.g. if you don't want to use a “light guide” and the LED is visible through a housing opening. However, in my opinion, in many cases it is better to use an SMD LED and a light guide.
Buy LEDs:
Do you need LEDs?
Then take a look here in the store.
RGB LEDs: Mixing colors with three signals
An RGB LED contains 3 diodes (red, green, blue) in one housing. Through different PWM signals millions of colors can be mixed.
Control: 3 PWM channels required
Structure: 4 pins (cathode or anode together)
Tip: work with transistors or driver ICs if high brightness is required
Smart LEDs such as WS2812 and Co.
These LEDs contain an integrated controller and can be controlled via a single data pin (usually, there are some with an extra clock line) - perfect for LED strips, rings or matrices.
Advantages:
Nur one data pin (mostly)
Addressable: each LED can be controlled individually
Control via libraries (e.g. FastLED, Adafruit NeoPixel)
Popular types:
WS2812 / WS2812B: RGB, 5 V, very popular
SK6812: RGBW, more colors, same control
APA102: RGB with separate clock line (better for long distances)
What are RGBW or WRGB LEDs?
RGBW LEDs (also known as WRGB) are an extension of classic RGB LEDs: in addition to the red, green and blue chips, they have a separate white LED chip. This allows Real, clean white tones in contrast to the somewhat color-cast “mixed white” from RGB. You can also combine RGB colors with white light, e.g. for pastel shades or greater brightness.
Depending on the LED type, there are:
RGBW (common anode or cathode) with 4 channels
Addressable RGBW LEDs, e.g. SK6812, which are controlled via a data pin in a similar way to WS2812
RGBW LEDs are ideal if you want to create colorful effects as well as usable white light for lighting or displays.
Control RGB LED via PWM with Arduino
Prerequisite:
RGB LED (common cathode)
3 suitable series resistors (approx. 220-330 Ω each)
Pins e.g. 9 (red), 10 (green), 11 (blue)
const int redPin = 9;
const int greenPin = 10;
const int bluePin = 11;

void setup() {
  pinMode(redPin, OUTPUT);
  pinMode(greenPin, OUTPUT);
  pinMode(bluePin, OUTPUT);
}

void loop() {
  analogWrite(redPin, 255);  // Full brightness red
  analogWrite(greenPin, 0);   // No green
  analogWrite(bluePin, 0);    // No blue
  delay(1000);

  analogWrite(redPin, 0);
  analogWrite(greenPin, 255); // Now green
  analogWrite(bluePin, 0);
  delay(1000);

  analogWrite(redPin, 0);
  analogWrite(greenPin, 0);
  analogWrite(bluePin, 255);  // Now blue
  delay(1000);
}
WS2812 / NeoPixel with Arduino
Prerequisite:
WS2812-LED or LED strip
Data line to e.g. pin 6
Library: Install Adafruit NeoPixel via library manager
#include "Adafruit_NeoPixel.h"

#define LED_PIN     6
#define LED_COUNT   3

Adafruit_NeoPixel strip(LED_COUNT, LED_PIN, NEO_GRB + NEO_KHZ800);

void setup() {
  strip.begin();
  strip.show(); // All LEDs off
}

void loop() {
  strip.setPixelColor(0, strip.Color(255, 0, 0)); // LED 0 Red
  strip.setPixelColor(1, strip.Color(0, 255, 0)); // LED 1 Green
  strip.setPixelColor(2, strip.Color(0, 0, 255)); // LED 2 Blue
  strip.show();
  delay(1000);
}
Conclusion: LEDs offer more than just light
Whether as a simple display or complex lighting control - LEDs are versatile, efficient and easy to integrate. The right control is important:
A series resistor is often sufficient for individual LEDs.
PWM is recommended for dimmable applications.
LED drivers or intelligent LEDs such as WS2812 are the first choice for larger installations.
With the knowledge gained from this article, you will not only be able to control LEDs correctly in future - but also make your projects brighter and more professional.